Post details: Effects with Camera Raw
05/10/06
Effects with Camera Raw

During my latest hike in Shenandoah mountains I took this photograph (above). By looking at the image you may think that I had to do a lot of manipulations in post-processing. Strangely, not at all. The main effect (bluish background with the fall) is achieved in Camera Raw. I simply played with the image in the Camera Raw tool before actually opening it in Photoshop. You want to find out how?
Ok. Here is what I saw when opened the image where all the settings are set to "auto":
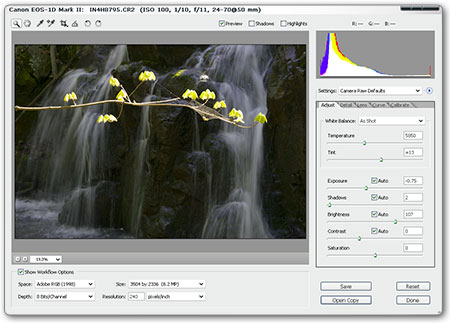
 As you see the image looks quite ordinary. No special effects yet, just a good exposure. And then I started to tweak the settings. My first step was to adjust the temperature, which I dropped significantly. The photograph started looked cold (bluish). The leaves started looked bleaker and somewhat green (instead of yellow). So I moved the Tint slider to the right, and something started to come out. The thing is that we have to find the right balance between blue (cool) background and yellow (warm) leaves.
Next steps are quite simple - correct the automatic settings, to make the background a bit darker, and the water slightly brighter, to let it stand out more.

And when I finally opened the image in Photoshop (converted from RAW) I added some vignetting and blurred the corners. Quite regular stuff, which is described in my article.
That's it. Most of the manipulations were made in Camera Raw.
Comments, Pingbacks:
No Comments/Pingbacks for this post yet...
Leave a comment:
Photography Things
When we find something interesting and useful, which we want to return to and share with others, it will be posted here. It could be about composition, digital effects, photoshop, photography business or links to interesting websites.

Subscribe to RSS feed
| Sun | Mon | Tue | Wed | Thu | Fri | Sat |
|---|---|---|---|---|---|---|
| << < | ||||||
| 1 | 2 | 3 | 4 | 5 | 6 | |
| 7 | 8 | 9 | 10 | 11 | 12 | 13 |
| 14 | 15 | 16 | 17 | 18 | 19 | 20 |
| 21 | 22 | 23 | 24 | 25 | 26 | 27 |
| 28 | 29 | 30 | ||||
Archives
- August 2008 (1)
- July 2008 (12)
- November 2007 (8)
- October 2007 (3)
- September 2007 (7)
- August 2007 (16)
- July 2007 (13)
- June 2007 (27)
- May 2007 (27)
- April 2007 (14)
- March 2007 (16)
- February 2007 (6)
- More...
Misc
 XML Feeds
What is RSS?


Who's Online?
- Guest Users: 62

Categories
- All
- Announcements (9)
- Business of photography (45)
- Equipment (72)
- General Photography (135)
- Lightroom Tips & Tutorials (10)
- News (11)
- Photographs (67)
- Photoshop and Effects (83)
- Tips (17)
- Story of a Photograph (3)
- Studio Photography (25)
- Web & Presentation (35)
- Wedding Photography (44)
- Wedding Planning (3)
LATEST POSTS
- 3D Is Not Enough - Meet 6D
- Understanding Light Stops
- Serious about becoming a Pro Wedding Photographer?
- Top 10: Ridiculous Wedding Customs
- Old Image Technique
- Pro Photo Life Blog
- Filters 101
- 10 Ways to Take Stunning Portraits
- When Pictures Hurt Websites
- Tips for Better Digital Photo Composition 101