Post details: Return of Background Layer
04/20/06
Return of Background Layer
While playing with some new effects I discovered a way to resurect the background layer after you made all the changes without preserving the original image. This technique is somewhat obvious, but how many times we overlook the obvious. Before I tried something like copy the original state, but such action will be recorded in the history and after that I cannot return to my final changes.
The image below kind of summarizes the everything I am going to explain further.
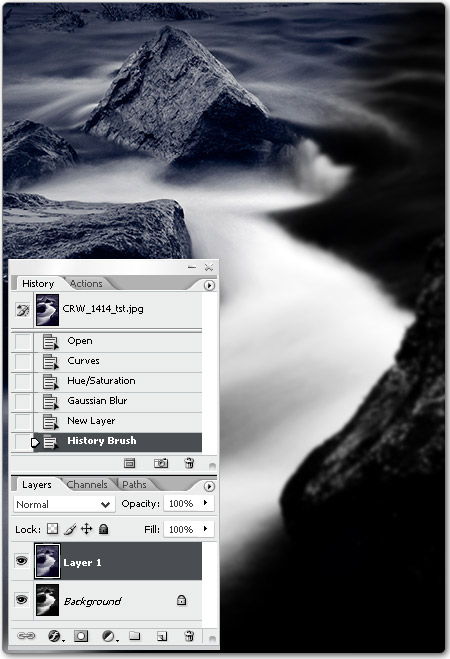
So let's go through the whole process.
- You open the image
- Make the changes to the image (without preserving the original image). In my case I increased the contrast, dessaturated and blurred the image (see the right bottom corner of the image above)
- Create a new layer (atop or below - depending where you want the original image)
- Select the History Brush tool in the tool pallete
- Make sure that the first state in the history stack is selected - The one against the image thumbnail. Usually it selected by defaulf
- Paint with the brush all over the new layer - restore the original state
And here you have the original image. Unfortunatelly there are some restrictions, which you may not always could overcome:
- The image should be in the same mode (RGB, LAB, CMYK, etc.) as the original one.
- The size and crop should be the same
The first one could be solved easily - just switch temporary back to the original mode (usually RGB mode). The second one is the tough one. If you resized the image (especiall reduced the size) you could try to resize it back and then apply History Brush. But for the crop - I have no solution so far.
 There is one more approach to resurect the background layer. In this case, I am talking about the image itself. While the original image (first state) is selected at the bottom of the History Panel you click at the icon as shown in the image. It will create a new document with the original image. Than you have to drag and drop that image (or the layer with it) back to the first document. And finally you have to manually position it in such a way that the two images coincide.
Comments, Pingbacks:
No Comments/Pingbacks for this post yet...
Leave a comment:
Photography Things
When we find something interesting and useful, which we want to return to and share with others, it will be posted here. It could be about composition, digital effects, photoshop, photography business or links to interesting websites.

Subscribe to RSS feed
| Sun | Mon | Tue | Wed | Thu | Fri | Sat |
|---|---|---|---|---|---|---|
| << < | ||||||
| 1 | 2 | 3 | 4 | |||
| 5 | 6 | 7 | 8 | 9 | 10 | 11 |
| 12 | 13 | 14 | 15 | 16 | 17 | 18 |
| 19 | 20 | 21 | 22 | 23 | 24 | 25 |
| 26 | 27 | 28 | 29 | 30 | 31 | |
Archives
- August 2008 (1)
- July 2008 (12)
- November 2007 (8)
- October 2007 (3)
- September 2007 (7)
- August 2007 (16)
- July 2007 (13)
- June 2007 (27)
- May 2007 (27)
- April 2007 (14)
- March 2007 (16)
- February 2007 (6)
- More...
Misc
 XML Feeds
What is RSS?


Who's Online?
- Guest Users: 65

Categories
- All
- Announcements (9)
- Business of photography (45)
- Equipment (72)
- General Photography (135)
- Lightroom Tips & Tutorials (10)
- News (11)
- Photographs (67)
- Photoshop and Effects (83)
- Tips (17)
- Story of a Photograph (3)
- Studio Photography (25)
- Web & Presentation (35)
- Wedding Photography (44)
- Wedding Planning (3)
LATEST POSTS
- 3D Is Not Enough - Meet 6D
- Understanding Light Stops
- Serious about becoming a Pro Wedding Photographer?
- Top 10: Ridiculous Wedding Customs
- Old Image Technique
- Pro Photo Life Blog
- Filters 101
- 10 Ways to Take Stunning Portraits
- When Pictures Hurt Websites
- Tips for Better Digital Photo Composition 101