Post details: Free Shape Crop using Clip Mask
04/21/06
Free Shape Crop using Clip Mask

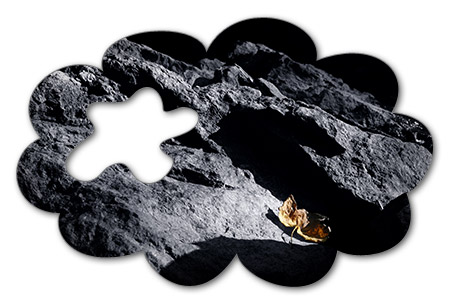
You probably noticed that images in the blog posts have rounded borders and shadows. I know that some people don't know how to do it, so here I am going to cast some light on this subject. To create such a crop of the image you can use any shape or just simply paint with brush. And the shadow here is just an optional effect, which you can replace with your own.
First of all I have to say that there is a restriction, as almost everywhere. The optional shadow works best with backgrounds of solid color. But as far as the transtion between the image and the outer space is clear, this technique does a good job.

Step 1: Open your image.
Step 2: Create a layer for the background color beneath.
If there is only one Background layer, then double click on that layer while holding Alt/Option key. After that create a new layer and place it underneath the image - Hold Ctrl/Command key and click on the icon of new layer at the bottom of the Layer Palette.
Step 3: Fill the bottom layer with your background color.
Choose the foreground color for the color to be used as the background. And while the bottom layer is select hold Alt/Option key and click Backspace/Delete key.
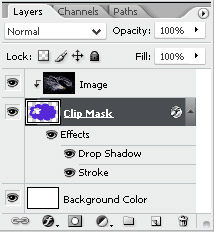
Step 4: Create Clip Mask.
Clip Mask is a separate layer that controls the opacity of all attached layers. The attachment of the layers will be our next step. At this moment simply create a new layer in between the image and the background color layer. To do so, click on the new layer icon at the bottom of the Layer Palette (or Ctrl-Shift-Alt-"N" or Command-Shift-Option-N).
Step 5: Attach the image to the Clip Mask
Slect the layer with the image and press Ctrl-Alt-G or Comman-Option-G. For older versions of PS (not CS2) it was simply Ctrl/Command-G. The image will disapear because the attached layers will be opaque if the corresponding pixels in the clip mask are filled with some color (not empty). And in our case the clip mask is empty.

Step 6: Create path of the specified shape
Select "Custom Shape tool" in the tool palette (or rounded rectanugalar, etc.) In the toolbar under the main menu specify that a path will be created (see figure above). And draw the shape to outline the visible area of the image.
Step 7: Select Outline
The outline we created is a path and we have to select the area covered by the path first and then fill. To select it, go to Path Palette (behind the Channels Palette) and while holding Ctrl/Comman click on the path (there should be only one, which is already selected).
Step 8: Fill Selected
Choose some color (I picked blue color) and fill the area pressing Alt/Option-Backspace/Delete for foreground color or Ctrl/Command-Backspace/Delete for background color.
Step 9: Optional - Add effects
Now you can add effects to the clip mask. I've added stroke and shadow.
Conclusion and Further Steps
If you followed the steps I described, you should have an image with a free shape border, which is surrounded by the background color. You can crop (regular crop) it tighter and it's ready for posting on the web. That's could be it or you can add more layer atop of the clip mask and they will automatically attach to the clip mask. It will make them to conform to the rules of your clip mask. And this is the benefit of this approach instead of Layer Mask - you make the mask once and apply to all the attached layers. To toggle the attachment use Ctrl-Alt-G or Comman-Option-G (for older versions of PS (not CS2) it was simply Ctrl/Command-G).
And you can always play (i.e. transform, paint upon, add effect and etc.) with your clip mask to make it more interesting and better suit your needs.
Comments, Pingbacks:
No Comments/Pingbacks for this post yet...
Leave a comment:
Photography Things
When we find something interesting and useful, which we want to return to and share with others, it will be posted here. It could be about composition, digital effects, photoshop, photography business or links to interesting websites.
Subscribe to RSS feed
| Sun | Mon | Tue | Wed | Thu | Fri | Sat |
|---|---|---|---|---|---|---|
| << < | ||||||
| 1 | 2 | 3 | 4 | |||
| 5 | 6 | 7 | 8 | 9 | 10 | 11 |
| 12 | 13 | 14 | 15 | 16 | 17 | 18 |
| 19 | 20 | 21 | 22 | 23 | 24 | 25 |
| 26 | 27 | 28 | 29 | 30 | 31 | |
Archives
- August 2008 (1)
- July 2008 (12)
- November 2007 (8)
- October 2007 (3)
- September 2007 (7)
- August 2007 (16)
- July 2007 (13)
- June 2007 (27)
- May 2007 (27)
- April 2007 (14)
- March 2007 (16)
- February 2007 (6)
- More...
Misc
 XML Feeds
What is RSS?
Who's Online?
- Guest Users: 57

Categories
- All
- Announcements (9)
- Business of photography (45)
- Equipment (72)
- General Photography (135)
- Lightroom Tips & Tutorials (10)
- News (11)
- Photographs (67)
- Photoshop and Effects (83)
- Tips (17)
- Story of a Photograph (3)
- Studio Photography (25)
- Web & Presentation (35)
- Wedding Photography (44)
- Wedding Planning (3)
LATEST POSTS
- 3D Is Not Enough - Meet 6D
- Understanding Light Stops
- Serious about becoming a Pro Wedding Photographer?
- Top 10: Ridiculous Wedding Customs
- Old Image Technique
- Pro Photo Life Blog
- Filters 101
- 10 Ways to Take Stunning Portraits
- When Pictures Hurt Websites
- Tips for Better Digital Photo Composition 101


